Subtitles can be a good way to draw people in to read your article when they land on the page. They can also help break up a big title and make it more readable. Let’s take a look at how you can add subtitles to a website using WordPress.
First off, why should you use subtitles? They can help visitors make their minds up very quickly on whether they will stay on your webpage or not. With a good title, good subtitle and maybe an interesting image above the fold you give yourself a high chance of that person sticking around.
Fortunately, if you use WordPress it’s quite easy to add subtitles to your post. Here’s a how-to guide.
Process to install subtitles on your WordPress website
Step 1
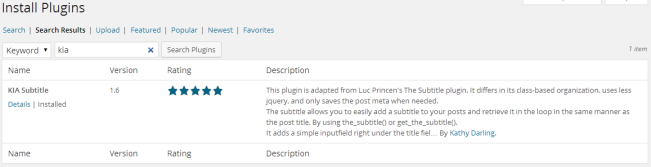
Install a plugin called “KIA Subtitle”. You can either install it directly from your WP admin by searching for it or download it directly from WordPress and upload it to your server. If you do it from your WordPress admin it will look a bit like this.
Step 2
Activate the plugin in your ‘Plugins’ section.
Step 3
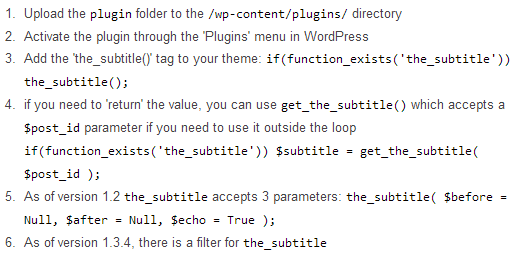
Insert the required coding in your single.php and page.php theme design files. Be sure to do this in your child theme. If you don’t wish to show them on pages you can skip the page.php bit. You can find the code on the installation page of the plugin listing. Here’s also a screenshot of the code you need.
Step 4
Visit one of your posts to check it hasn’t caused errors or theme issues. If it has you may have installed the code wrong. If your implementation looks fine in the file it may be clashing with something else, in this case, you will have to investigate to find the issue.
Step 5
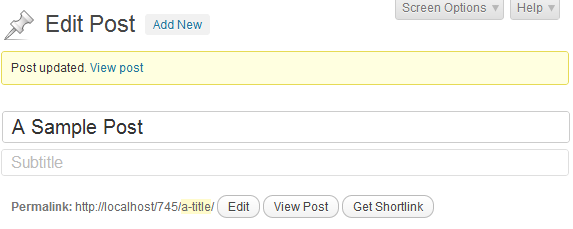
Create a draft post. Or if you want to get straight live with it choose one of your posts that doesn’t receive much traffic and add a subtitle in. The reason to choose an article without much traffic is that you’re going to use it as a dummy to sort out the CSS styling. It shouldn’t take long but it isn’t wise to do it on a post that is getting traffic in case of any issues. Using a draft post makes the most sense unless you’re impatient.
Step 6
Once you have added the subtitle visit the post and see how it looks. If it looks great then awesome. But if not go into your style.css file in your child theme folder and add this bit of code.
h2.subtitle { color: green; }
Within that code add the styling you want to include such as padding and font color. It shows font color as green in the example code above but add in the styling you want. Keep tweaking it until it looks great.
Step 7
Now go through your most successful posts and pages and add subtitles to them. You don’t have to go into each post and do it individually, it’s far easier and quicker to go into the ‘All Posts’ section and click on ‘Quick Edit’ below post titles. See the screenshot below for a demonstration. How many you add is up to you. For established blogs it would probably take far too long to add subtitles to all your existing posts.

Step 8
Get posting new content complete with subtitles. Remember if on some posts you don’t want to show a subtitle you don’t have to. It will not show a big blank space. It will still look great without a subtitle showing. This is one of the good aspects of this plugin. It looks great when you use it but has no side effects when you don’t. Another great thing is it shouldn’t slow down how quickly your website loads.
Conclusion
Because you put in the code of the “KIA Subtitles” plugin where you want it you reduce the chance of issues with your theme. On MoneyCortex we only show the subtitles in actual posts. But not in the categories or anywhere else. But where you do want to show it add the code from Step 3 in those places. There’s also a shortcode if you want to just show it in the post content from time to time. The shortcode is:
[the-subtitle]A problem you may have is if you have an archive containing thousands of blog posts then you have the issue of going through all of them. Unfortunately, it doesn’t take a few seconds either, you have to think of a good quality compelling subtitle that will draw your readers in and intrigue them. You could hire a freelancer to do the job but this may get costly. If you’re in this position it makes sense to go through your most popular posts and add a subtitle to those first. And then obviously as you continue to publish new content you will add subtitles into those to get the benefits going forward.
The is one of many ways to add subtitles. Keep researching for other ways to do it if this method didn’t work out.
If you have any issues with the plugin talked about on this page please ask for support in the forum of the plugin on the official WordPress website. Good luck with your installation and happy blogging.
Last update: July 7, 2023